In this guide, you’ll find some information to help you diagnose your system in the event of a problem with Methylene.
Diode value, measured with the red probe on ground and the black probe on the indicate PIN of Methylene, values may fluctuate slightly from one console to another. These measurements were made with Methylene installed and running in a PS2 Slim, on an unpowered console. If a value is different, check your installation and soldering.
these values are for guidance only, and only a 10/20% change in value may indicate a problem.
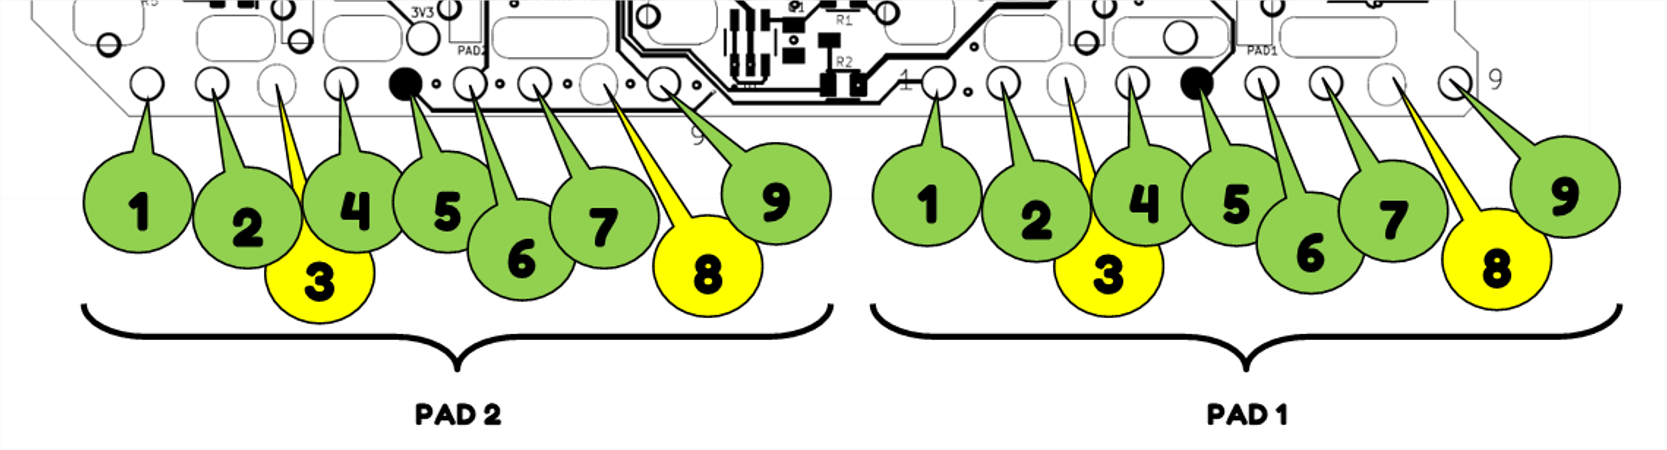
| Pad 2 | Pad 1 | ||||
|---|---|---|---|---|---|
| Pin | Diode value (V) | Ohm value | Pin | Diode value (V) | Ohm value |
| 1 | 0.48 | 600 | 1 | 0.48 | 593 |
| 2 | 0.518 | 653 | 2 | 0.558 | 712 |
| 3 | 0.53 (not used by methylene) | 678 | 3 | 0.53 (not used by methylene) | 676 |
| 4 | 0.0 | 0 | 4 | 0.0 | 0 |
| 5 | 1.0 | 1.5k | 5 | 1.0 | 1.5k |
| 6 | 0.53 | 672 | 6 | 0.53 | 750 |
| 7 | 0.52 | 672 | 7 | 0.57 | 675 |
| 8 | 0.52 (not used by methylene) | 672 | 8 | 0.53 (not used by methylene) | 675 |
| 9 | 0.47 | 586 | 9 | 0.47 | 592 |
Check voltage
When the console is connected to the mains, power is supplied (console LED in standby mode).
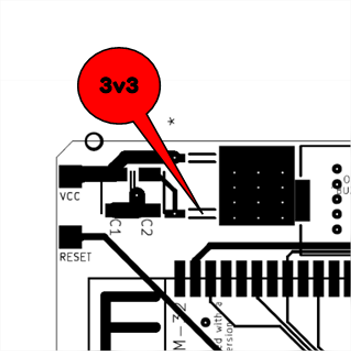
On the VCC connector you should have a voltage of 8.5v for SCPH70/75/77/79xxx series and 7v on SCPH90xxx.
And on the indicated point, you should have a voltage of about 3v3.
Short-circuit check
Although these are large solder joints, some shorts may not be directly visible on the ESP32, so check adjacent connections for shorts.
Depending on which PINs are short-circuited, the problems may be anything from no sign of life, overheating of the ESP32, lack of joystick detection, to unsolicited console power-up.
Carry out your test in continuity mode and follow this diagram to check adjacent short circuits:
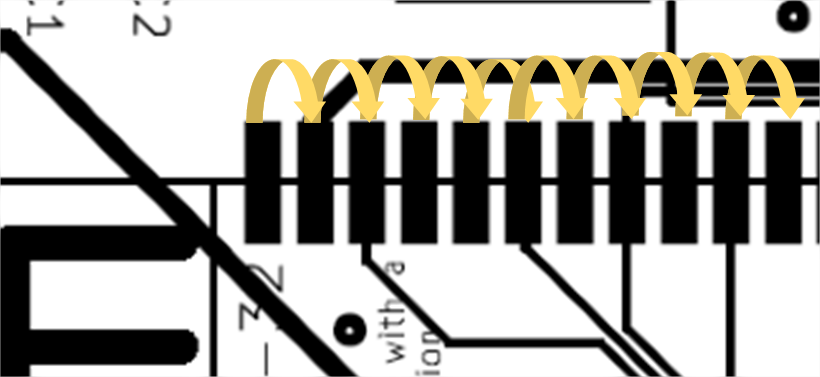
You can check this short video, to see how I test for good solder join and for adjacent shortcircuit (you have to check all side of ESP32):
To explain, I am in continuity test mode (beeping mode). I place my probe at the top of the connection and at the bottom to verify that the solder joint is good, then I leave my probe at the bottom of the previous solder and place my probe at the top. If I don’t get a beep when both are on it, it means the solder is not good. If it beeps when both are on different pads, it means there’s a short circuit, and the solder needs to be redone, excess removed, or in some cases the ESP32 needs to be completely desoldered.
Firmware
If all previous tests are correct, check that you have flashed the correct firmware. This must be a version of Blueretro modified for Methylene, as it is modified to work differently for console startup management. You can check this by connecting via Bluetooth just by powering your console, without needing to boot it.
Controller port detection
First of all, quadruple check port isolation as mentioned in installation guide.
The principle is to let Methyelene, not the console, manage the 3v3 power supply to the wired controller. You therefore need to unlink the console’s PIN5 from the console’s 3v3.
In some rare cases, with some controllers, wired controller detection may not work properly. This is an isolated case, and depends on the controller used. Future versions of methylene should solve this problem. A solution for modifying existing methylene will be proposed, although not recommended (it will be necessary to cut traces and add 2 components to the circuit, as well as relocate and re-solder wires).